This is my first free pattern that I am publishing! Hooray! I have always said that if I ever had a recipe blog, I would skip all the fluff and get right to the recipe. A pattern is basically a fiber art recipe, so that’s what I am going to do! There will be no long, drawn out story about how I love pumpkins and how I came to make this pattern…you know what I’m talking about! However, there are a few things you need to know before you get started, so take a look at the sections preceding the pattern. Thanks!
Finished pumpkin dimensions: 4″ tall body, 1″ tall stem, 15″ circumference
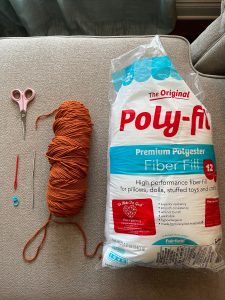
Materials
3.5 mm crochet hook (E/4)
I Love This Yarn! worsted weight yarn in Burnt Pumpkin from Hobby Lobby – 100 yards or less; about half a skein
Small amount of worsted weight yarn for stem – I used I Love This Yarn! in Coffee
Stitch Marker
Large eye plastic needle for sewing
Polyfil stuffing
Stitches
Stitches you must know in order to make this pattern include:
Magic Circle
Single Crochet
Invisible increase (optional)
Invisible decrease (optional)
Abbreviations
MC – magic circle
SC – single crochet
INC – increase
DEC – decrease
INV – invisible
Notes
- Make sure to tighten your magic circle once you have all of the needed stitches in it.
- Stitches are worked in a spiral, in the round. You will not need to slip stitch or chain at the end of the round. Please use a stitch marker to keep track of which round you are on.
- When making amigurumi, we want the stitches to be tight enough that the stuffing does not show through. Keep your tension tight enough for this, but loose enough to easily work in the stitches. You will come to feel what is best for you and your own tension.
- To INC, make 2 SC in the same stitch.
- To DEC, SC 2 together over 2 stitches.
- A number in front of SC means to SC across that number of stitches. For example, 2 SC means SC in the next two stitches. However, INC means to make 2 SC in the same stitch.
- To make INC and DEC invisible, simply make those stitches in the front loop only. That will be the loop that is on the “outside” or “right side” of your work.
- Numbers in ( ) at the end of the line indicate the total number of stitches in that round.
- Instructions within ( ) are meant to be repeated for the remainder of the round, until I say otherwise. For example, in round 3, I denote that you are to repeat the (2 sc, inc) UNTIL you have one stitch left, then you are to sc in that last stitch.
- I like to place my stitch marker on the FIRST stitch of that round, but you can also do it on the last stitch. What is important is that you know where your first and last stitches are. Remember to move your stitch marker each time you finish a round.
- Leave a very long tail after finishing the pumpkin body – you will use this tail to shape the pumpkin.
- Leave a long tail after finishing the stem to use to sew to the body.
- When shaping the pumpkin, pull the tail of the yarn as tight as you possibly can. This will make the lines of the tail less visible and give the pumpkin deep, distinctive grooves.
- When attaching the stem, lightly stuff it. I like to leave some room in it for me to shape it with my fingers; I like the slightly curved shape. If you overstuff it, you won’t be able to shape it, and you may see the stuffing through the stitches.
- Make sure to tie knots and weave in your ends at the end! It’s the least fun part, but really makes it look professional and clean.
Okay! Let’s get started!!
Pumpkin Body Pattern
With burnt orange yarn:
- 6 SC in MC, tighten, and place stitch marker (6)
- INC around (12)
- (1 SC, INC) around (18)
- 1 SC, INC, (2 SC, INC) until last stitch, 1 SC (24)
- (3 SC, INC) around (30)
- 2 SC, INC, (4 SC, INC) until last 2 stitches, 2 SC (36)
- (5 SC, INC) around (42)
- 3 SC, INC, (6 SC, INC) until last 3 stitches, 3 SC (48)
- (7 SC, INC) around (54)
- 4 SC, INC, (8 SC, INC) until last 4 stitches, 4 SC (60)
- SC around (60)
- SC around (60)
- SC around (60)
- SC around (60)
- SC around (60)
- SC around (60)
- SC around (60)
- SC around (60)
- SC around (60)
- SC around (60)
- 4 SC, DEC, (8 SC, DEC) until last 4 stitches, 4 SC (54)
- (7 SC, DEC) around (48)
- 3 SC, DEC, (6 SC, DEC) until last 3 stitches, 3 SC (42)
- (5 SC, DEC) around (36)
- 2 SC, DEC, (4 SC, DEC) until last 2 stitches, 2 SC (30)
- (3 SC, DEC) around (24) *STUFF FIRMLY WITH POLYFIL NOW!*
- 1 SC, DEC, (2 SC, DEC) until last stitch, 1 SC (18)
- (1 SC, DEC) around (12)
- 6 DEC around (6)
Leave a 18″-24″ long tail, then cut yarn. Tie knot in yarn (I pull the tail through the yarn on the hook like I am making a chain). Thread your plastic sewing needle with the long tail, then close the hole by weaving through the remaining 6 stitches. Pull tightly to close. DO NOT CUT YARN!
Shaping the Pumpkin
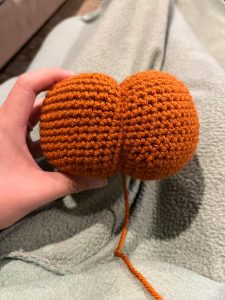
This part can be confusing if you have never done it before, so I will include pictures to clarify. Your pumpkin body should be stuffed firmly, sewn shut, and in the shape of a circle/ball.
- Take your needle, threaded with the long tail, and insert it into the center of the 6 SC (the hole you just closed up).
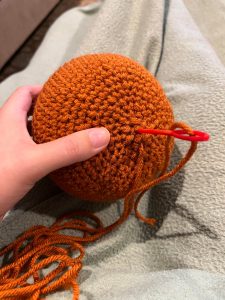
- You are going to pull the needle and thread through the center of the pumpkin, all the way to the other end and through the magic circle that you started with at the bottom. Now, your pumpkin is fully stuffed at this point, so it may take a few tries to get all the way through. I like to squish the body of the pumpkin with one hand while pushing the needle through with the other hand. This makes the distance shorter and gives you a more stable trajectory.
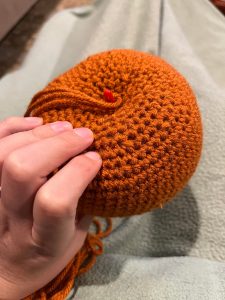
- Once the needle and thread are all the way through the center of the pumpkin, pull the tail tight. This will make an indention in the center of the pumpkin. Take the needle and tail and insert it back into the top magic circle. You will have some of the tail wrapping around the outside of the pumpkin; this is what you want to happen. Thread the tail and the needle through the center of the pumpkin and out through the center of the bottom magic ring. Pull the tail very tight. This will make a deep groove into the pumpkin.
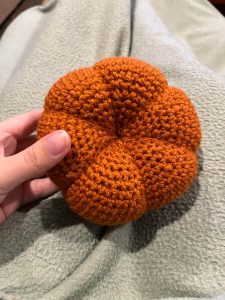
- Continue bringing the needle and tail up and around the body of the pumpkin, inserting through the center of the top magic circle, threading through the center of the pumpkin, pulling through the center of the bottom magic circle, and pulling tightly. Do this a total of 6 times to make 6 deep, equally spaced grooves. Imagine it like you are slicing a cake or a pizza! Here is what it should look like once you finish this step.

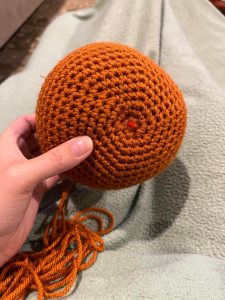
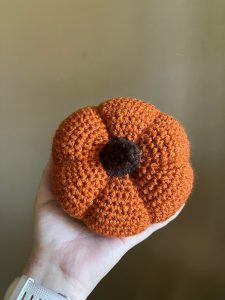
- Tie a double knot close to where the tail of the yarn is coming out. To weave in this end, insert needle through any stitch close to where the tail is and out through the other side of the pumpkin. The knot and the majority of the tail should now be inside the pumpkin. Cut excess yarn. This is what your finished pumpkin body should look like from the top.
Stem Pattern
With coffee yarn:
- 6 SC in MC, tighten, and place stitch marker (6)
- (6 SC) around (6)
- (INC) around (12)
- 12 SC around (12)
- 12 SC around (12)
- (5 SC, INC) twice (14)
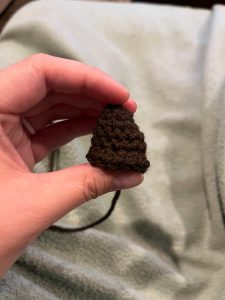
Leave a long tail for sewing, then cut yarn. Tie a knot in yarn. Lightly stuff the stem, leaving some room at the bottom to be able to easily sew.
Sewing the Stem to the Pumpkin
- Thread your plastic sewing needle with the tail of the stem. Insert the needle into one of the stitches on the top of the pumpkin, a few rounds outward from the center of the magic circle. You may want to lightly rest the stem over the center of the pumpkin to see how it fits and where you would like to sew it. Here’s how I started mine (see picture below).

- Insert the needle through the loops of the next stitch on the bottom of the stem and pull through. Continue this process, evenly sewing around the center and securing the stem to the pumpkin. When you reach the end of the stitches of the stem, make sure you do one more sewing stitch to close up any holes and ensure the stem is completely fastened on. Tie a double knot close to where your tail is coming out from the stem, then insert your needle and tail through any stitch close to the knot, pulling through the stem and out through the other side. The knot and part of the tail will now be inside the pumpkin; this is how you will weave in this end.

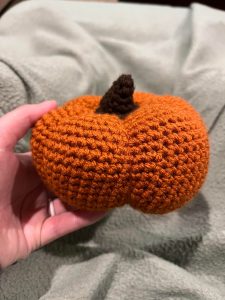
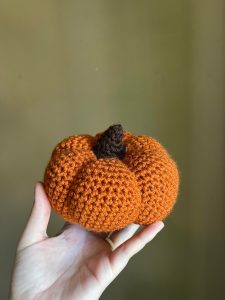
- Cut excess yarn. Shape the stem with your fingers to your liking. I like to grab it at the base and gently pull up and curve it, to make a sort of hook-like shape. Yours can be straight, hooked, or whatever shape you would like! Here’s how the finished project should look.

That’s it! You did it!!
Way to go! You just made an amigurumi pumpkin! You should be proud of yourself!!
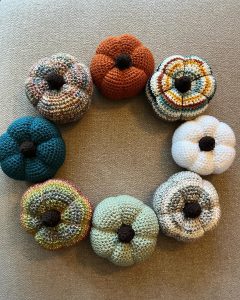
Here are some more pictures of the finished pumpkin. I chose to make this one in the classic orange color, but you can do any color you want! Below I will include a picture of an order I made of 8 of these pumpkins in 8 different colors and patterns.

Thank you for using my pattern! This is the first pattern I have publicly written and shared, so I would love your feedback. Please comment with any questions you may have, and any suggestions that could be useful.
I would love to see your pumpkins! If you post your progress to social media, please tag me 1) so that people know where to find the pattern and 2) so that I can see your work! I am Katelyn Marie Customs everywhere – Instagram, Facebook, Pinterest, and Etsy.
This pattern is an original pattern by Katelyn Burkholder of Katelyn Marie Customs. Please to DO NOT copy or redistribute this pattern. You may share this pattern by sharing the link. You may sell completed items made from this pattern, but please DO NOT claim this pattern as your own or try to sell the pattern itself. If you sell the finished pumpkins, please credit the design to me. Not intended for mass production.
Nice post!
Good post!